
But what about the other 10 and a half months after the eight boxes you bought are all gone? Well then you make your own! This is a short series we're gonna do that will keep that Girl Scout craving satisfied all year long. Plus we've stumbled upon some retired Girl Scout cookie recipes so you can get that taste back in your mouth that you've been missing.
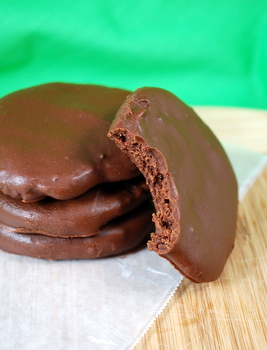
Thin Mints are the Girl Scouts’ best selling cookies – although Samoas, Do-si-dos and Tagalongs have their fans, too – when they have their annual cookie sale. These crispy cookies are easy to make at home and taste even better than the “real” thing. The dough is made in advance, rolled into a log and chilled. This allows the cookies to be sliced off easily into rounds so there is no need to fiddle with a cookie cutter.
Once baked, they are dipped into a dark chocolate coating. I used Guittard chocolate for this batch and would definitely recommend getting a good quality dark chocolate to work with, starting with a bar and chopping it up. Semisweet chocolate – by which I mean chocolate chips – will work pretty well, too, although you might need to add an extra tablespoon of butter if your chocolate doesn’t get thin enough to ensure a thin cookie coating.
The cookies can be stored at room temperature in an airtight container for several days, but like “real” Girl Scout cookies, they taste great when frozen and will last for weeks – if not longer – in the freezer.
Homemade Thin Mints
2 1/4 cups all purpose flour
1/4 cup cornstarch
6 tbsp unsweetened cocoa powder
1/2 tsp salt
1 cup white sugar
1/2 cup butter, room temperature
1/3 cup milk (any kind)
1/2 tsp vanilla extract
3/4 tsp peppermint extract
In a small bowl, whisk together flour, cornstarch, cocoa powder and salt.
In a large bowl, cream together butter and sugar. With the mixer on low speed, add in the milk and the extracts. Mixture will look curdled. Gradually, add in the flour mixture until fully incorporated.
Shape dough into two logs, about 1 1/2 inches (or about 4 cm) in diameter, wrap in plastic wrap and freeze for at least 1-2 hours, until dough is very firm.
Preheat oven to 375F.
Slice dough into rounds not more than 1/4 inch thick – if they are too thick, they will not be as crisp – and place on a parchment lined baking sheet. Cookies will not spread very much, so you can put them quite close together.
Bake for 13-15 minutes, until cookies are firm at the edges. Cool cookies completely on a wire rack before dipping in chocolate.
Dark Chocolate Coating
10-oz dark or semisweet chocolate
1/2 cup butter, room temperature
In a microwave safe bowl, combine chocolate and butter. Melt on high power in the microwave, stirring every 45-60 seconds, until chocolate is smooth. Chocolate should have a consistency somewhere between chocolate syrup and fudge for a thin coating.
Dip each cookie in melted chocolate, turn with a fork to coat, then transfer to a piece of parchment paper or wax paper to set up for at least 30 minutes, or until chocolate is cool and firm.
Reheat chocolate as needed to keep it smooth and easy to dip into.
Makes 3 1/2-4 dozen cookies.

You need a print button... :)
ReplyDelete